VMware: Porovnání verzí
Z Poznámkový blok
(→Upgrade ESXI 6.0.0) |
(→Upgrade ESXI 6.0.0) |
||
| Řádka 211: | Řádka 211: | ||
3. Stažení instalace příslušné aktualizace (jedná se o jednotlivé verze, proto provádět postupně a vždy restartovat stroj): | 3. Stažení instalace příslušné aktualizace (jedná se o jednotlivé verze, proto provádět postupně a vždy restartovat stroj): | ||
| + | # Build 3249451 | ||
| + | esxcli software profile update -p ESXi-6.0.0-20160104001-standard -d https://hostupdate.vmware.com/software/VUM/PRODUCTION/main/vmw-depot-index.xml | ||
| + | |||
# Build 3620759 | # Build 3620759 | ||
esxcli software profile update -p ESXi-6.0.0-20160302001-standard -d https://hostupdate.vmware.com/software/VUM/PRODUCTION/main/vmw-depot-index.xml | esxcli software profile update -p ESXi-6.0.0-20160302001-standard -d https://hostupdate.vmware.com/software/VUM/PRODUCTION/main/vmw-depot-index.xml | ||
Verze z 4. 1. 2017, 21:15
Obsah
Nové virtuální PC
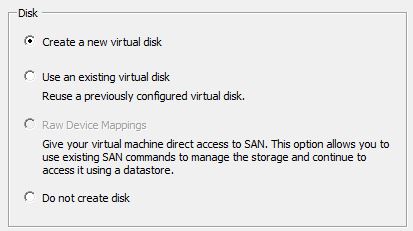
Nový disk
| BusLogic Parallel | Text buňky |
| LSI Logic Parallel | Text buňky |
| LSI Logic SAS | Text buňky |
| VMware Paravirtual | Text buňky |
| Create a new virtual disk | Vytvořit nový virtuální disk |
| Use an existing virtual disk | Použít existující virtuální disk |
| Raw Device Mapping | Raw mapovaný ovladač |
| Do not create disk | Nevytvoří disk |
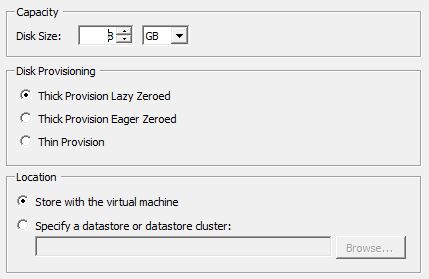
| Disk Size | Velikost disku |
| - | - |
| Thick Provision Lazy zeroed | Vytvoření celého disku bez jeho vynulování |
| Thick Provision Eager zeroed | Vytvoření celého disku z vynulováním celého disku |
| Thin Provision | Text buňky |
| - | - |
| Store with the virtual machine | Vytvořit na virtuálním stroji |
| Specify a datastore or datastore cluster | Určit datové úložiště nebo cluster |
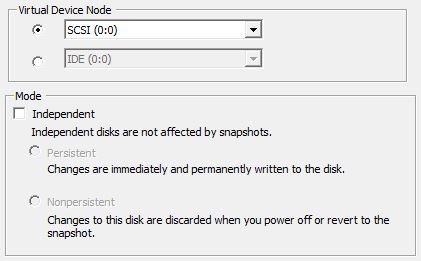
| Virtual Device Node | Ovladač virtuálního uzlu |
| - | - |
| Mode | Mód |
| Persistent | Změny se okamžitě a natrvalo zapisují na disk |
| Nonpersistent | Změny na tomto disku jsou vyřazeny při vypnutí, nebo se vrátit k poslednímu snímku |
Instalace ovladačů
Linux
Přes konzolu VMeare připojíme CD disk "Connect to ISO image on datastore" kde následně nalistujeme "Datastores / vmimages / tools-isoimages / linux.iso". Následně připojíme disk příkazem mount poté se přesuneme do adresáře z ovladači a spustíme podle verze linuxu (32, nebo 64 bit).
mount /dev/cdrom /mnt
cd /mnt
ls -l
./vmware-tools-upgrader-..
Vlastni instalace
Do you still want to proceed with this legacy installer? [no] yes

Creating a new VMware Tools installer database using the tar4 format.

Installing VMware Tools.

In which directory do you want to install the binary files?
[/usr/bin]

What is the directory that contains the init directories (rc0.d/ to rc6.d/)?
[/etc]

What is the directory that contains the init scripts?
[/etc/init.d]

In which directory do you want to install the daemon files?
[/usr/sbin]

In which directory do you want to install the library files?
[/usr/lib/vmware-tools]

The path "/usr/lib/vmware-tools" does not exist currently. This program is
going to create it, including needed parent directories. Is this what you want?
[yes]

In which directory do you want to install the documentation files?
[/usr/share/doc/vmware-tools]

The path "/usr/share/doc/vmware-tools" does not exist currently. This program
is going to create it, including needed parent directories. Is this what you
want? [yes]

The installation of VMware Tools 9.10.5 build-2981885 for Linux completed
successfully. You can decide to remove this software from your system at any
time by invoking the following command: "/usr/bin/vmware-uninstall-tools.pl".

Before running VMware Tools for the first time, you need to configure it by
invoking the following command: "/usr/bin/vmware-config-tools.pl". Do you want
this program to invoke the command for you now? [yes]
Initializing...

Making sure services for VMware Tools are stopped.

Stopping VMware Tools services in the virtual machine:
  Guest operating system daemon:                                      done
  VMware User Agent (vmware-user):                                    done
  Unmounting HGFS shares:                                             done
  Guest filesystem driver:                                            done


The module vmci has already been installed on this system by another installer
 .
 .
 .
installer or package and will not be modified by this installer.

The VMware Host-Guest Filesystem allows for shared folders between the host OS
and the guest OS in a Fusion or Workstation virtual environment.  Do you wish
to enable this feature? [no]

The vmxnet driver is no longer supported on kernels 3.3 and greater. Please
upgrade to a newer virtual NIC. (e.g., vmxnet3 or e1000e)

The vmblock enables dragging or copying files between host and guest in a
Fusion or Workstation virtual environment.  Do you wish to enable this feature?
[no]

VMware automatic kernel modules enables automatic building and installation of
VMware kernel modules at boot that are not already present. This feature can
be enabled/disabled by re-running vmware-config-tools.pl.

Would you like to enable VMware automatic kernel modules?
[no] yes

Do you want to enable Guest Authentication (vgauth)? [yes]

No X install found.

Creating a new initrd boot image for the kernel.
update-initramfs: Generating /boot/initrd.img-3.16.0-4-amd64
  Checking acpi hot plug                                              done
Starting VMware Tools services in the virtual machine:
  Switching to guest configuration:                                   done
  VMware Automatic Kmods:RpcIn: received 5 bytes
                                                                      done
  Guest operating system daemon:                                      done
  VGAuthService:                                                      done
The configuration of VMware Tools 9.10.5 build-2981885 for Linux for this
running kernel completed successfully.

You must restart your X session before any mouse or graphics changes take
effect.

You can now run VMware Tools by invoking "/usr/bin/vmware-toolbox-cmd" from the
command line.

To enable advanced X features (e.g., guest resolution fit, drag and drop, and
file and text copy/paste), you will need to do one (or more) of the following:
1. Manually start /usr/bin/vmware-user
2. Log out and log back into your desktop session; and,
3. Restart your X session.

Enjoy,

--the VMware team

Done waiting for process: 579 (success)
Writing the command was a success to fd 4
Child w/ fd 3 exited with code=0
Waiting on pid 578 to de-zombify it
Upgrader: setting sendCancelOnEnd flag to FALSE
Exiting UpgraderLoop because we are done
Cleaning up /tmp/vmware-root/6db4109c...
done.
Upgrader: To VMX: tools.capability.hgfs_server tools-upgrader 0
Rpci: Sending request='tools.capability.hgfs_server tools-upgrader 0'
Rpci: Sent request='tools.capability.hgfs_server tools-upgrader 0', reply=, len=0, status=1
RpcIn: Unregistering callback 'f'
HgfsChannelGuest_Exit: app tools-upgrader rpc = 0 rpc cb = 0 chn = 7EFFE138BDC0.
HgfsChannelExitServer: Teardown Hgfs server.
HgfsChannelExitChannel: Exit channel returns.
Upgrade ESXI 6.0.0
1. Vypnutí firewallu:
esxcli network firewall ruleset set -e true -r httpClient
2. Zkontrolujeme dostupné profily image ESXi:
esxcli software sources profile list -d https://hostupdate.vmware.com/software/VUM/PRODUCTION/main/vmw-depot-index.xml
3. Stažení instalace příslušné aktualizace (jedná se o jednotlivé verze, proto provádět postupně a vždy restartovat stroj):
# Build 3249451
esxcli software profile update -p ESXi-6.0.0-20160104001-standard -d https://hostupdate.vmware.com/software/VUM/PRODUCTION/main/vmw-depot-index.xml

# Build 3620759
esxcli software profile update -p ESXi-6.0.0-20160302001-standard -d https://hostupdate.vmware.com/software/VUM/PRODUCTION/main/vmw-depot-index.xml

# Build 4192238
esxcli software profile update -p ESXi-6.0.0-20160804001-standard -d https://hostupdate.vmware.com/software/VUM/PRODUCTION/main/vmw-depot-index.xml
4. Opětovné zapnutí firewallu:
esxcli network firewall ruleset set -e false -r httpClient


